| Previous | Contents | Index |
When you select "CPU" on the Filter tabs, the Availability Manager displays the OpenVMS CPU Filters page (Figure 7-10).
Figure 7-10 OpenVMS CPU Filters
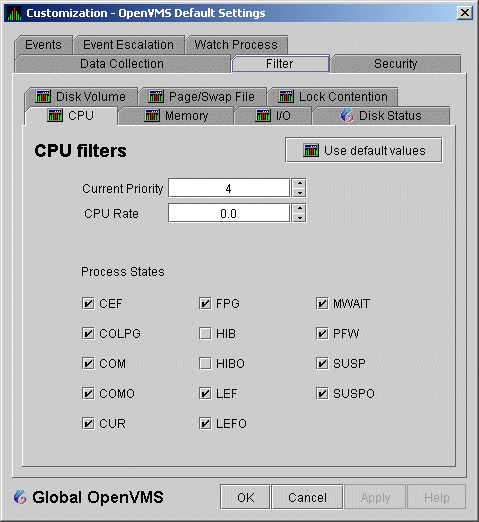
The OpenVMS CPU Filters page allows you to change and select values that are displayed on the OpenVMS CPU Process States page (Figure 3-8).
You can change the current priority and rate of a process. By default, a process is displayed only if it has a Current Priority of 4 or more. Click the up or down arrow to increase or decrease the priority value by one. The default CPU rate is 0.0, which means that processes with any CPU rate used will be displayed. To limit the number of processes displayed, you can click the up or down arrow to increase or decrease the CPU rate by .5 each time you click.
The OpenVMS CPU Filters page also allows you to select the states of
the processes that you want to display on the CPU Process States page.
Select the check box for each state you want to display. (Process
states are described in Appendix B.)
7.6.2 OpenVMS Disk Status Filters
When you select Disk Status on the Filter tabs, the Availability Manager displays the OpenVMS Disk Status Filters page (Figure 7-11).
Figure 7-11 OpenVMS Disk Status Filters
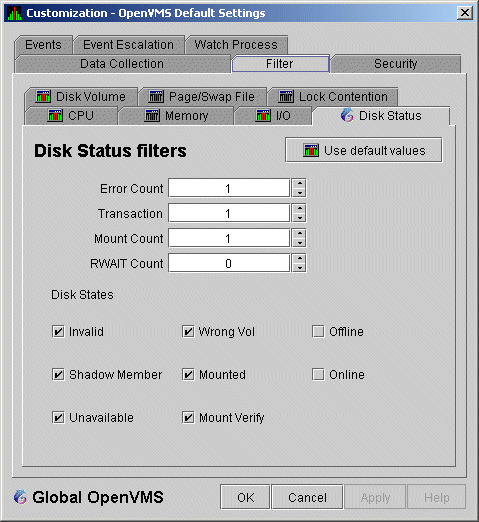
The OpenVMS Disk Status Summary page (Figure 3-14) displays the values you set on this page.
This page lets you change the following default values:
| Data | Description |
|---|---|
| Error Count | The number of errors generated by the disk (a quick indicator of device problems). |
| Transaction | The number of in-progress file system operations for the disk. |
| Mount Count | The number of nodes that have the specified disk mounted. |
| RWAIT Count | An indicator that a system I/O operation is stalled, usually during normal connection failure recovery or volume processing of host-based shadowing. |
This page also lets you check the states of the disks you want to display, as described in the following table:
| Disk State | Description |
|---|---|
| Invalid | Disk is in an invalid state (Mount Verify Timeout is likely). |
| Shadow Member | Disk is a member of a shadow set. |
| Unavailable | Disk is set to unavailable. |
| Wrong Vol | Disk was mounted with the wrong volume name. |
| Mounted | Disk is logically mounted by a MOUNT command or a service call. |
| Mount Verify | Disk is waiting for a mount verification. |
| Offline | Disk is no longer physically mounted in device drive. |
| Online | Disk is physically mounted in device drive. |
When you select Disk Volume on the Filter tabs, the Availability Manager displays the OpenVMS Disk Volume Filters page (Figure 7-12).
Figure 7-12 OpenVMS Disk Volume Filters
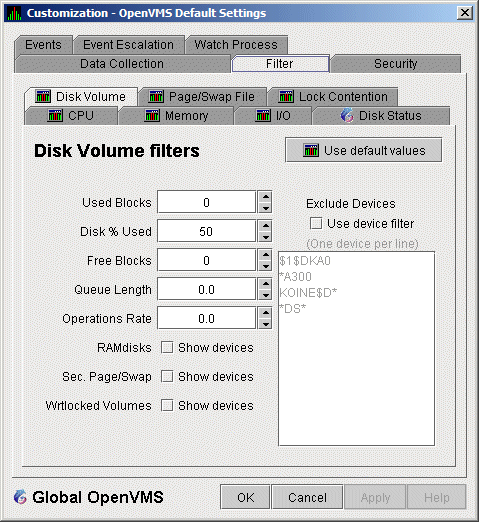
The OpenVMS Disk Volume Filters page allows you to change the values for the following data:
| Data | Description |
|---|---|
| Used Blocks | The number of volume blocks in use. |
| Disk % Used | The percentage of the number of volume blocks in use in relation to the total volume blocks available. |
| Free Blocks | The number of blocks of volume space available for new data. |
| Queue Length | Current length of I/O queue for a volume. |
| Operations Rate | The rate at which the operations count to the volume has changed since the last sampling. The rate measures the amount of activity on a volume. The optimal load is device specific. |
You can also change options for the following to be on (checked) or off (unchecked):
When you select I/O on the Filter tabs, the Availability Manager displays the OpenVMS I/O Filters page (Figure 7-13).
Figure 7-13 OpenVMS I/O Filters
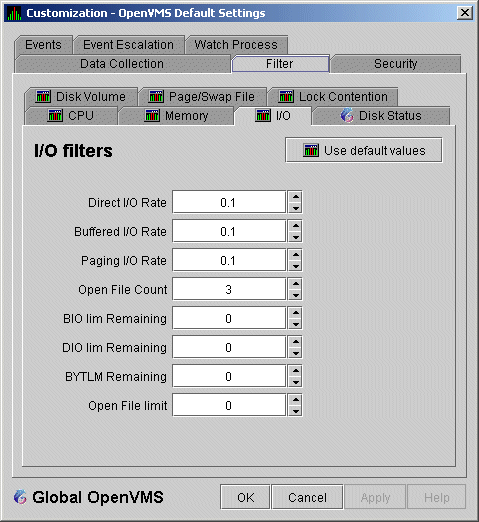
The OpenVMS I/O Summary page (Figure 3-12) displays the values you set on this filters page.
This filters page allows you to change values for the following data:
| Data | Description |
|---|---|
| Direct I/O Rate | The rate of direct I/O transfers. Direct I/O is the average percentage of time that the process waits for data to be read from or written to a disk or tape. The possible state is DIO. Direct I/O is usually disk or tape I/O. |
| Buffered I/O Rate | The rate of buffered I/O transfers. Buffered I/O is the average percentage of time that the process waits for data to be read from or written to a slower device such as a terminal, line printer, mailbox. The possible state is BIO. Buffered I/O is usually terminal, printer I/O, or network traffic. |
| Paging I/O Rate | The rate of read attempts necessary to satisfy page faults (also known as Page Read I/O or the Hard Fault Rate). |
| Open File Count | The number of open files. |
| BIO lim Remaining | The number of remaining buffered I/O operations available before the process reaches its quota. BIOLM quota is the maximum number of buffered I/O operations a process can have outstanding at one time. |
| DIO lim Remaining | The number of remaining direct I/O limit operations available before the process reaches its quota. DIOLM quota is the maximum number of direct I/O operations a process can have outstanding at one time. |
| BYTLM Remaining | The number of buffered I/O bytes available before the process reaches its quota. BYTLM is the maximum number of bytes of nonpaged system dynamic memory that a process can claim at one time. |
| Open File limit | The number of additional files the process can open before reaching its quota. FILLM quota is the maximum number of files that can be opened simultaneously by the process, including active network logical links. |
The OpenVMS Lock Contention Filters page allows you to remove (filter out) resource names from the Lock Contention page (Figure 3-19).
When you select Lock Contention on the Filter tabs, the Availability Manager displays the OpenVMS Lock Contention Filters page (Figure 7-14).
Figure 7-14 OpenVMS Lock Contention Filters
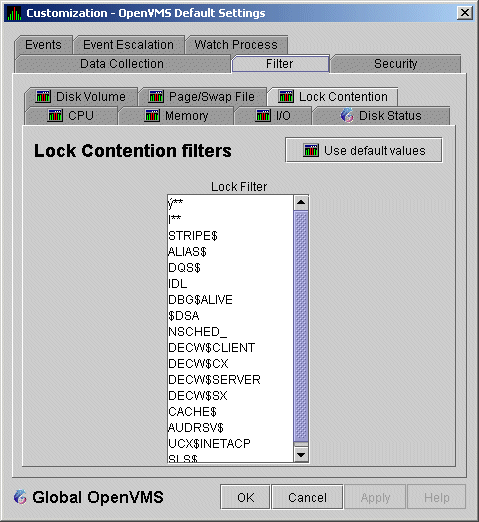
Each entry on the Lock Contention Filters page is a resource name or
part of a resource name that you want to filter out. For example, the
STRIPE$ entry filters out any value that starts with the characters
STRIPE$. To redisplay values set previously, select Use default
values.
7.6.6 OpenVMS Memory Filters
When you select Memory Filters on the Filter tabs, the Availability Manager displays a OpenVMS Memory Filters page that is similar to the one shown in (Figure 7-15).
Figure 7-15 OpenVMS Memory Filters

The OpenVMS Memory page (Figure 3-10) displays the values on this filter page.
The OpenVMS Memory Filters page allows you to change values for the following data:
| Data | Description |
|---|---|
| Working Set Count | The number of physical pages or pagelets of memory that the process is using. |
| Working Set Size | The number of pages or pagelets of memory the process is allowed to use. The operating system periodically adjusts this value based on an analysis of page faults relative to CPU time used. An increase in this value in large units indicates a process is receiving a lot of page faults and its memory allocation is increasing. |
| Working Set Extent | The number of pages or pagelets of memory in the process's WSEXTENT quota as defined in the user authorization file (UAF). The number of pages or pagelets will not exceed the value of the system parameter WSMAX. |
| Page Fault Rate | The number of page faults per second for the process. |
| Page I/O Rate | The rate of read attempts necessary to satisfy page faults (also known as page read I/O or the hard fault rate). |
When you select Page/Swap File on the Filter tabs, the Availability Manager displays the OpenVMS Page/Swap File Filters page (Figure 7-16).
Figure 7-16 OpenVMS Page/Swap File Filters
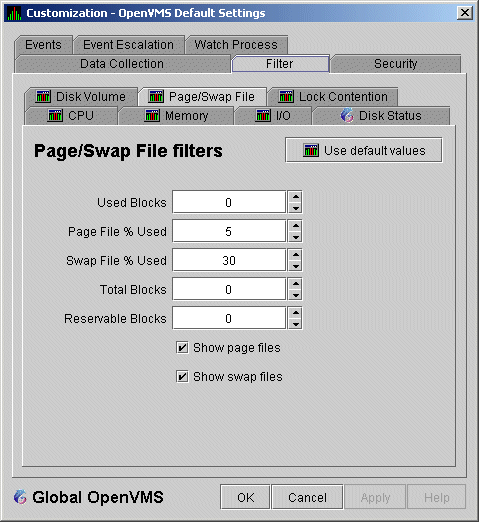
The OpenVMS I/O Summary page (Figure 3-12) displays the values that you set on this filter page.
This filter page allows you to change values for the following data:
| Data | Description |
|---|---|
| Used Blocks | The number of used blocks within the file. |
| Page File % Used | The percentage of the blocks from the page file that have been used. |
| Swap File % Used | The percentage of the blocks from the swap file that have been used. |
| Total Blocks | The total number of blocks in paging and swapping files. |
| Reservable Blocks |
Number of reservable blocks in each paging and swapping file currently
installed. Reservable blocks can be logically claimed by a process for
a future physical allocation. A negative value indicates that the file
might be overcommitted. Note that a negative value is not an immediate
concern but indicates that the file might become overcommitted if
physical memory becomes scarce.
Note: Reservable blocks are not used in more recent versions of OpenVMS. |
You can also select (turn on) or clear (turn off) the following options:
You can customize the way events are displayed in the Event pane of the System Overview window (Figure 2-1) and configure events to be signaled to OPCOM or HP OpenView. You do this by setting the criteria that determine whether events are signaled on the Event Escalation Customization page (Figure 7-17).
Event escalation is the one set of Availability Manager parameters that you can adjust at all four configuration levels (Application, Operating System, Group, and Node). |
When you select any of the customization options, the Availability Manager displays a tabbed page similar to the one shown in Figure 7-17.
Figure 7-17 Event Escalation Customization
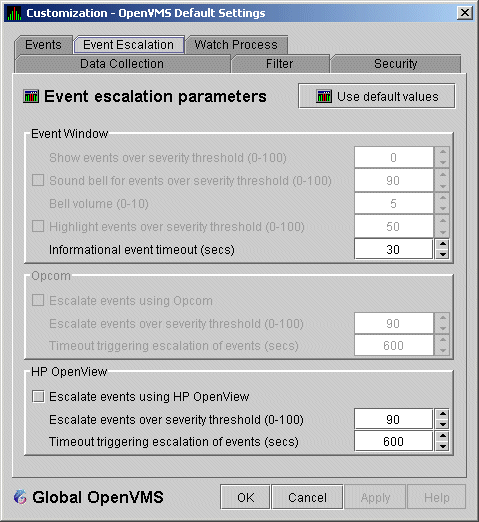
The Event Escalation Customization page contains the following sections:
| Availability Manager | OpenView |
|---|---|
| 0 - 19 | Normal |
| 20 - 39 | Warning |
| 40 - 59 | Minor |
| 60 - 79 | Major |
| 80 - 100 | Critical |
For an event to be escalated using OPCOM or HP OpenView, the following conditions must be met:
|
Figure 7-18 Event Customizations
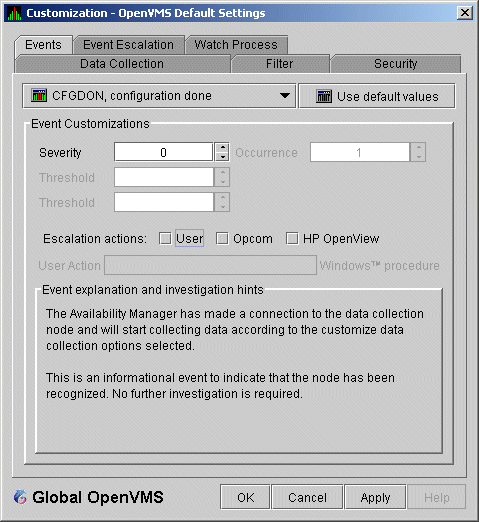
The instructions in this section are for configuring HP OpenView on Windows. (The configuration for HP-UX systems is very similar; instructions, however, are not included in this section.) |
Installing the HP OpenView Server
Prior to configuring HP OpenView, you must perform two steps:
http://h71000.www7.hp.com/openvms/products/availman/docs.html |
Configuring the HP OpenView Server and Agents
You can run the Availability Manager on a Windows or on an OpenVMS system.
If you run the Availability Manager on a Windows system, follow these steps:
HP OpenView\Operations Manager |
If you run the Availability Manager on an OpenVMS system, follow these steps:
http://h71000.www7.hp.com/openvms/products/openvms_ovo_agent/index.html |
On the OpenView server you can create or modify policies or templates of the Open Message Interface group to manipulate events that the Availability Manager has escalated. For parameters or options fields set by the Availability Manager, see Table 7-5.
| Parameter or Option Field | Description |
|---|---|
| <$MSG_APPL> | Application: "AvailMan" (appears to be case sensitive) |
| <$MSG_OBJECT> | Object: 6-character event name (example: "HIBIOR") |
| <$MSG_GRP> | Group: Node originating the event (example: "CMOVEQ") |
| <$MSG_SEV> | Derived from <$OPTION(SEVERITY)> in the Availability Manager; the Availability Manager maps SEVERITY to NORMAL, WARNING, MINOR, MAJOR, CRITICAL |
| <$MSG_TEXT> | Message text: Event description (example: "CMOVEQ buffered I/O rate is high") |
| <$MSG_NODE> | Node running AvailMan |
| <$MSG_NODE_NAME> | Node running AvailMan |
| <$OPTION(NODE)> | Node originating the event (example: "CMOVEQ") |
| <$OPTION(GROUP)> | Group to which originating node belongs (example: "Debug cluster") |
| <$OPTION(SEQUENCE_NUMBER)> | AM internal event sequence number (example: "14") |
| <$OPTION(SEVERITY)> | AM event severity (0-100) (example: "60") |
| <$OPTION(EVENT)> | 6-character event name (example: "HIBIOR") |
| <$OPTION(TIME)> | Original time event posted (example: "15-Aug-2005 14:41:44.164") |
You can customize a number of characteristics of the events that are displayed in the Event pane of the System Overview window (Figure 2-1). You can also use customization options to notify users when specific events occur.
When you select the Operating System --> Customize OpenVMS... or Operating System --> Customize Windows NT... from the System Overview window Customize menu, the Availability Manager displays a tabbed page similar to the one shown in Figure 7-19.
Figure 7-19 Event Customizations

On OpenVMS systems, you can customize events at the operating system, group, or node level. On Windows systems, you you can customize events at the operating system or node level.
Keep in mind that an event that you customize at the group level overrides the value set at a previous (higher) level (see Table 7-1).
| Previous | Next | Contents | Index |