 |
HP OpenVMS systems documentation |
| Previous | Contents | Index |
Use the SMG$CREATE_PASTEBOARD routine to create a pasteboard and associate it with a physical device. SMG$CREATE_PASTEBOARD returns a unique pasteboard identification number; use that number to refer to the pasteboard in subsequent calls to SMG$ routines. After associating a pasteboard with a device, your program references only the pasteboard. The screen management facility performs all necessary operations between the pasteboard and the physical device. Example 22-4 creates a pasteboard.
| Example 22-4 Creating a Pasteboard |
|---|
STATUS = SMG$CREATE_PASTEBOARD (PBID, ROWS, COLUMNS) IF (.NOT. STATUS) CALL LIB$SIGNAL (%VAL (STATUS)) |
When you create a pasteboard, the screen management facility clears the screen by default. To clear the screen yourself, invoke the SMG$ERASE_PASTEBOARD routine. Any virtual displays associated with the pasteboard are removed from the screen, but their contents in memory are not affected. The following example erases the screen:
STATUS = SMG$ERASE_PASTEBOARD (PBID) IF (.NOT. STATUS) CALL LIB$SIGNAL (%VAL (STATUS)) |
Invoking the SMG$DELETE_PASTEBOARD routine deletes a pasteboard, making the screen unavailable for further pasting. The optional second argument of the SMG$DELETE_PASTEBOARD routine allows you to indicate whether the routine clears the screen (the default) or leaves it as is. The following example deletes a pasteboard and clears the screen:
STATUS = SMG$DELETE_PASTEBOARD (PBID) IF (.NOT. STATUS) CALL LIB$SIGNAL (%VAL (STATUS)) |
By default, the screen is erased when you create a pasteboard.
Generally, you should erase the screen at the end of a session.
22.4.3.3 Setting Screen Dimensions and Background Color
The SMG$CHANGE_PBD_CHARACTERISTICS routine sets the dimensions of the screen and its background color. You can also use this routine to retrieve dimensions and background color. To get more detailed information about the physical device, use the SMG$GET_PASTEBOARD_ATTRIBUTES routine. Example 22-5 changes the screen width to 132 and the background to white, then restores the original width and background before exiting.
| Example 22-5 Modifying Screen Dimensions and Background Color |
|---|
. . . INTEGER*4 WIDTH, 2 COLOR INCLUDE '($SMGDEF)' ! Get current width and background color STATUS = SMG$CHANGE_PBD_CHARACTERISTICS (PBID,, 2 WIDTH,,,, 2 COLOR) IF (.NOT. STATUS) CALL LIB$SIGNAL (%VAL (STATUS)) ! Change width and background color STATUS = SMG$CHANGE_PBD_CHARACTERISTICS (PBID, 2 132,,,, 2 SMG$C_COLOR_WHITE) IF (.NOT. STATUS) CALL LIB$SIGNAL (%VAL (STATUS)) . . . ! Restore width and background color STATUS = SMG$CHANGE_PBD_CHARACTERISTICS (PBID, 2 WIDTH,,,, 2 COLOR) IF (.NOT. STATUS) CALL LIB$SIGNAL (%VAL (STATUS)) |
You write to virtual displays, which are logically configured as
rectangles, by using the SMG$ routines. The dimensions of a virtual
display are designated vertically as rows and horizontally as columns.
A position in a virtual display is designated by naming a row and a
column. Row and column numbers begin at 1.
22.4.4.1 Creating a Virtual Display
Use the SMG$CREATE_VIRTUAL_DISPLAY routine to create a virtual display. SMG$CREATE_VIRTUAL_DISPLAY returns a unique virtual display identification number; use that number to refer to the virtual display.
Optionally, you can use the fifth argument of SMG$CREATE_VIRTUAL_DISPLAY to specify one or more of the following video attributes: blinking, bolding, reversing background, and underlining. All characters written to that display will have the specified attribute unless you indicate otherwise when writing text to the display. The following example makes everything written to the display HEADER_VDID appear bold by default:
INCLUDE '($SMGDEF)' . . . STATUS = SMG$CREATE_VIRTUAL_DISPLAY (1, ! Rows 2 80, ! Columns 2 HEADER_VDID,, 2 SMG$M_BOLD) |
You can border a virtual display by specifying the fourth argument when you invoke SMG$CREATE_VIRTUAL_DISPLAY. You can label the border with the routine SMG$LABEL_BORDER. If you use a border, you must leave room for it: a border requires two rows and two columns more than the size of the display. The following example places a labeled border around the STATS_VDID display. As pasted, the border occupies rows 2 and 13 and columns 1 and 57.
STATUS = SMG$CREATE_VIRTUAL_DISPLAY (10, ! Rows 2 55, ! Columns 2 STATS_VDID, 2 SMG$M_BORDER) IF (.NOT. STATUS) CALL LIB$SIGNAL (%VAL (STATUS)) STATUS = SMG$LABEL_BORDER (STATS_VDID, 2 'statistics') IF (.NOT. STATUS) CALL LIB$SIGNAL (%VAL (STATUS)) STATUS = SMG$PASTE_VIRTUAL_DISPLAY (STATS_VDID, 2 PBID, 2 3, ! Row 2 2) ! Column |
To make a virtual display visible, paste it to a pasteboard using the SMG$PASTE_VIRTUAL_DISPLAY routine. You position the virtual display by specifying which row and column of the pasteboard should contain the upper left corner of the display. Example 22-6 defines two virtual displays and pastes them to one pasteboard.
| Example 22-6 Defining and Pasting a Virtual Display |
|---|
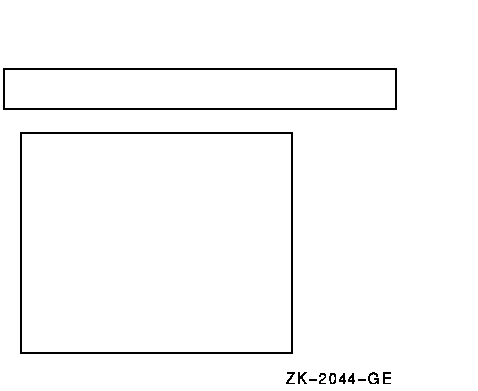
. . . INCLUDE '($SMGDEF)' INTEGER*4 PBID, 2 HEADER_VDID, 2 STATS_VDID INTEGER*4 STATUS, 2 SMG$CREATE_PASTEBOARD, 2 SMG$CREATE_VIRTUAL_DISPLAY, 2 SMG$PASTE_VIRTUAL_DISPLAY ! Create pasteboard for SYS$OUTPUT STATUS = SMG$CREATE_PASTEBOARD (PBID) IF (.NOT. STATUS) CALL LIB$SIGNAL (%VAL (STATUS)) ! Header pastes to first rows of screen STATUS = SMG$CREATE_VIRTUAL_DISPLAY (3, ! Rows 2 78, ! Columns 2 HEADER_VDID, ! Name 2 SMG$M_BORDER) ! Border IF (.NOT. STATUS) CALL LIB$SIGNAL (%VAL (STATUS)) STATUS = SMG$PASTE_VIRTUAL_DISPLAY (HEADER_VDID, 2 PBID, 2 2, ! Row 2 2) ! Column IF (.NOT. STATUS) CALL LIB$SIGNAL (%VAL (STATUS)) ! Statistics area pastes to rows 5 through 15, ! columns 2 through 56 STATUS = SMG$CREATE_VIRTUAL_DISPLAY (10, ! Rows 2 55, ! Columns 2 STATS_VDID, ! Name 2 SMG$M_BORDER) ! Border IF (.NOT. STATUS) CALL LIB$SIGNAL (%VAL (STATUS)) STATUS = SMG$PASTE_VIRTUAL_DISPLAY (STATS_VDID, 2 PBID, 2 5, ! Row 2 2) ! Column IF (.NOT. STATUS) CALL LIB$SIGNAL (%VAL (STATUS)) . . . |
Figure 22-1 shows the screen that results from Example 22-6.
Figure 22-1 Defining and Pasting Virtual Displays

You can paste a single display to any number of pasteboards. Any time you change the display, all pasteboards containing the display are automatically updated.
A pasteboard can hold any number of virtual displays. You can paste virtual displays over one another to any depth, occluding the displays underneath. The displays underneath are only occluded to the extent that they are covered; that is, the parts not occluded remain visible on the screen. (In Figure 22-2, displays 1 and 2 are partially occluded.) When you unpaste a virtual display that occludes another virtual display, the occluded part of the display underneath becomes visible again.
You can find out whether a display is occluded by using the SMG$CHECK_FOR_OCCLUSION routine. The following example pastes a two-row summary display over the last two rows of the statistics display, if the statistics display is not already occluded. If the statistics display is occluded, the example assumes that it is occluded by the summary display and unpastes the summary display, making the last two rows of the statistics display visible again.
  STATUS = SMG$CHECK_FOR_OCCLUSION (STATS_VDID,
2                                   PBID,
2                                   OCCLUDE_STATE)
! OCCLUDE_STATE must be defined as INTEGER*4
  IF (OCCLUDE_STATE) THEN
    STATUS = SMG$UNPASTE_VIRTUAL_DISPLAY (SUM_VDID,
2                                         PBID)
    IF (.NOT. STATUS) CALL LIB$SIGNAL (%VAL (STATUS))
  ELSE
    STATUS = SMG$PASTE_VIRTUAL_DISPLAY (SUM_VDID,
2                                       PBID,
2                                       11,
2                                       2)
    IF (.NOT. STATUS) CALL LIB$SIGNAL (%VAL (STATUS))
  END IF
|
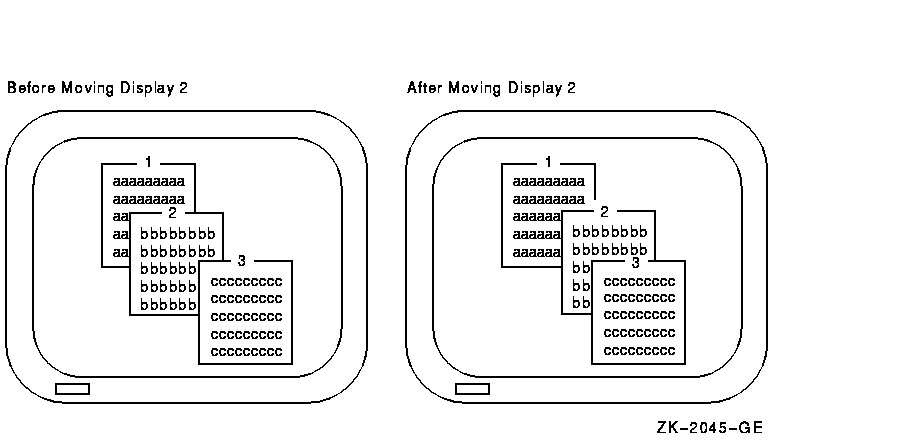
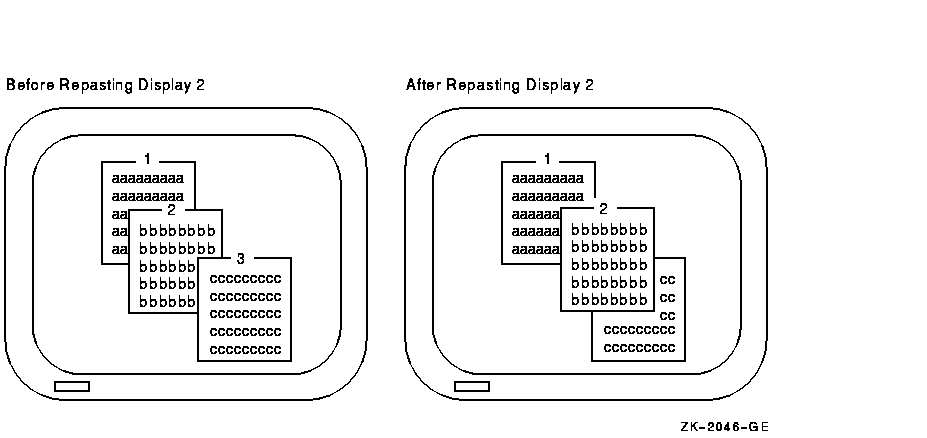
Pasted displays can be rearranged by moving or repasting.
STATUS = SMG$MOVE_VIRTUAL_DISPLAY (VDID, 2 PBID, 2 5, 2 10) IF (.NOT. STATUS) CALL LIB$SIGNAL (%VAL(STATUS)) |
Figure 22-2 Moving a Virtual Display

STATUS = SMG$REPASTE_VIRTUAL_DISPLAY (VDID, 2 PBID, 2 4, 2 4) IF (.NOT. STATUS) CALL LIB$SIGNAL (%VAL(STATUS)) |
Figure 22-3 Repasting a Virtual Display

You can obtain the pasting order of the virtual displays using
SMG$LIST_PASTING_ORDER. This routine returns the identifiers of all the
virtual displays pasted to a specified pasteboard.
22.4.4.4 Removing Virtual Displays
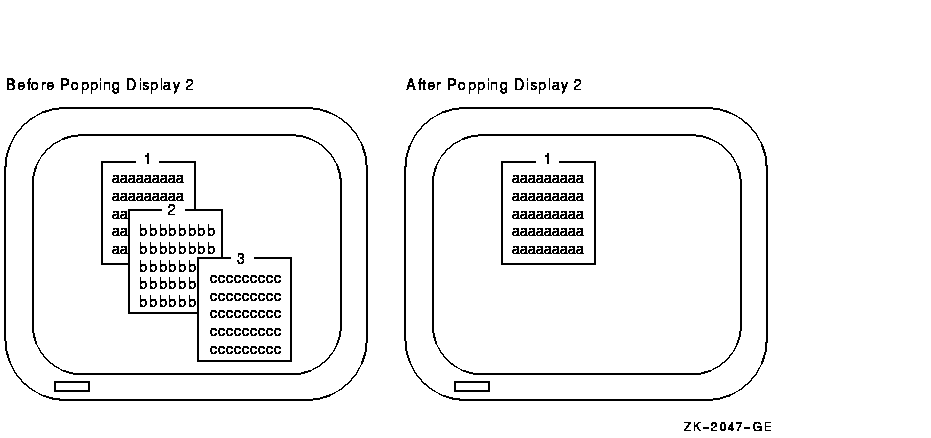
You can remove a virtual display from a pasteboard in a number of different ways:
STATUS = SMG$UNPASTE_VIRTUAL_DISPLAY (STATS_VDID, 2 PBID) IF (.NOT. STATUS) CALL LIB$SIGNAL (%VAL (STATUS)) |
STATUS = SMG$DELETE_VIRTUAL_DISPLAY (STATS_VDID) IF (.NOT. STATUS) CALL LIB$SIGNAL (%VAL (STATUS)) |
STATUS = SMG$POP_VIRTUAL_DISPLAY (STATS_VDID, 2 PBID) IF (.NOT. STATUS) CALL LIB$SIGNAL (%VAL (STATUS)) |
Figure 22-4 Popping a Virtual Display

The screen management facility provides several routines for modifying the characteristics of an existing virtual display:
The following example uses SMG$CHANGE_VIRTUAL_DISPLAY to change the size of the WHOOPS display to five rows and seven columns and to turn off all of the display's default video attributes. If you decrease the size of a display that is on the screen, any characters in the excess area are removed from the screen.
STATUS = SMG$CHANGE_VIRTUAL_DISPLAY (WHOOPS_VDID, 2 5, ! Rows 2 7,, ! Columns 2 0) ! Video attributes off |
The following example uses SMG$CHANGE_RENDITION to direct attention to the first 20 columns of the statistics display by setting the reverse video attribute to the complement of the display's default setting for that attribute:
STATUS = SMG$CHANGE_RENDITION (STATS_VDID, 2 1, ! Row 2 1, ! Column 2 10, ! Number of rows 2 20, ! Number of columns 2 , ! Video-set argument 2 SMG$M_REVERSE) ! Video-comp argument 2 |
SMG$CHANGE_RENDITION uses three sets of video attributes to determine the attributes to apply to the specified portion of the display: (1) the display's default video attributes, (2) the attributes specified by the rendition-set argument of SMG$CHANGE_RENDITION, and (3) the attributes specified by the rendition-complement argument of SMG$CHANGE_RENDITION. Table 22-2 shows the result of each possible combination.
| rendition-set | rendition-complement | Result |
|---|---|---|
| off | off | Uses display default |
| on | off | Sets attribute |
| off | on | Uses the complement of display default |
| on | on | Clears attribute |
In the preceding example, the reverse video attribute is set in the rendition-complement argument but not in the rendition-set argument, thus specifying that SMG$CHANGE_RENDITION use the complement of the display's default setting to ensure that the selected portion of the display is easily seen.
Note that the resulting attributes are based on the display's default
attributes, not its current attributes. If you use SMG$ routines that
explicitly set video attributes, the current attributes of the display
may not match its default attributes.
22.4.4.6 Using Spawned Subprocesses
You can create a spawned subprocess directly with an SMG$ routine to allow execution of a DCL command from an application. Only one spawned subprocess is allowed per virtual display. Use the following routines to work with subprocesses:
Viewports allow you to view different pieces of a virtual display by moving a rectangular area around on the virtual display. Only one viewport is allowed for each virtual display. Once you have associated a viewport with a virtual display, the only part of the virtual display that is viewable is contained in the viewport.
The SMG$ routines for working with viewports include the following:
The SMG$ output routines allow you to write text to displays and to
delete or modify the existing text of a display. Remember that changes
to a virtual display are visible only if the virtual display is pasted
to a pasteboard.
22.4.6.1 Positioning the Cursor
Each virtual display has its own logical cursor position. You can control the position of the cursor in a virtual display with the following routines:
In addition, many routines permit you to specify a starting location other than the current cursor position for the operation.
The SMG$RETURN_CURSOR_POS routine returns the row and column of the current cursor position within a virtual display. You do not have to write special code to track the cursor position.
Typically, the physical cursor is at the logical cursor position of the
most recently written-to display. If necessary, you can use the
SMG$SET_PHYSICAL_CURSOR routine to set the physical cursor location.
22.4.6.2 Writing Data Character by Character
If you are writing character by character (see Section 22.4.6.3 for line-oriented output), you can use three routines:
These routines are simple and precise. They place exactly the specified characters on the screen, starting at a specified position in a virtual display. Anything currently in the positions written-to is overwritten; no other positions on the screen are affected. Convert numeric data to character data with language I/O statements before invoking SMG$PUT_CHARS.
The following example converts an integer to a character string and places it at a designated position in a virtual display:
CHARACTER*4 HOUSE_NO_STRING INTEGER*4 HOUSE_NO, 2 LINE_NO, 2 STATS_VDID . . . WRITE (UNIT=HOUSE_NO_STRING, 2 FMT='(I4)') HOUSE_NO STATUS = SMG$PUT_CHARS (STATS_VDID, 2 HOUSE_NO_STRING, 2 LINE_NO, ! Row 2 1) ! Column |
Note that the converted integer is right-justified from column 4 because the format specification is I4 and the full character string is written. To left-justify a converted number, you must locate the first nonblank character and write a substring starting with that character and ending with the last character.
Inserting and Overwriting Text
To insert characters rather than overwrite the current contents of the screen, use the routine SMG$INSERT_CHARS. Existing characters at the location written to are shifted to the right. Characters pushed out of the display are truncated; no wrapping occurs and the cursor remains at the end of the last character inserted.
Specifying Double-Size Characters
In addition to the preceding routines, you can use SMG$PUT_CHARS_WIDE to write characters to the screen in double width or SMG$PUT_CHARS_HIGHWIDE to write characters to the screen in double height and double width. When you use these routines, you must allot two spaces for each double-width character on the line and two lines for each line of double-height characters. You cannot mix single-and double-size characters on a line.
All the character routines provide rendition-set and rendition-complement arguments, which allow you to specify special video attributes for the characters being written. SMG$PUT_CHARS_MULTI allows you to specify more than one video attribute at a time. The explanation of the SMG$CHANGE_RENDITION routine in Section 22.4.4.5 discusses how to use rendition-set and rendition-complement arguments.
| Previous | Next | Contents | Index |