Chapter 3 - Generating Books
This chapter describes how to generate whole books from HTML files.Overview
While HTMLDOC can convert web pages into PostScript and PDF files, its real strength is generating indexed HTML, PostScript, or PDF books.HTMLDOC uses HTML heading elements to delineate chapters and
headings in a book. The H1 element is used for chapters:
<HTML>
<HEAD>
    <TITLE>The Little Computer that Could</TITLE>
</HEAD>
<BODY>
<H1>Chapter 1 - The Little Computer is Born</H1>
...
<H1>Chapter 2 - Little Computer's First Task</H1>
...
</BODY>
</HTML>
Sub-headings are marked using the H2 through H6
elements.
| Note:
When using book mode, HTMLDOC starts rendering with
the first |
Choosing HTML Files
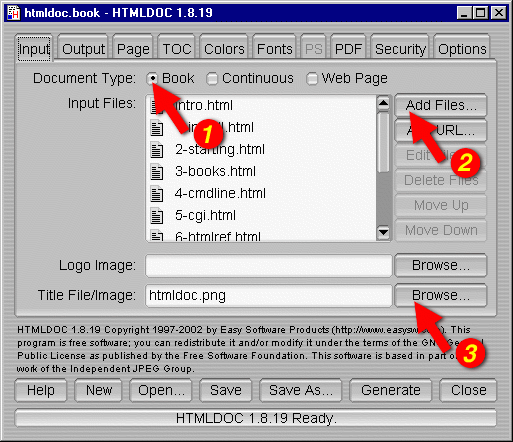
Start by clicking on the Book radio button (1) to specify you'll be converting one or more HTML files into a book.
Then choose one or more files for conversion by clicking on the Add Files... button (2). When the file chooser dialog appears, pick the file(s) you wish to convert from the list of files and then click on the OK button.

Figure 3-1: The Input Tab
Selecting a Title File
HTMLDOC supports automatic generation of a title page
using an image file, the title text, and other META
information on it. Type the title image filename into the
Title File field or click on the Browse...
button (3) to select a title image for your book. HTMLDOC
can also use a HTML file that you have generated for the title
page(s). To use a HTML title page, type the title filename into
the Title File field or click on the
Browse... button (3) to select a HTML file for your
book.

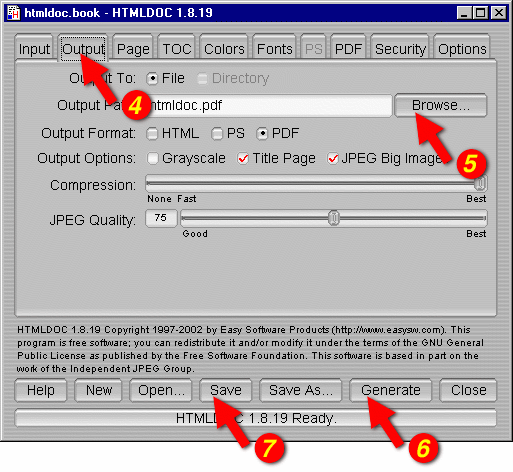
Figure 3-2: The Output Tab
Setting the Output Format
The output format is set in the Output tab (4). Click on the Output tab and then click on the HTML, PS, or PDF radio buttons to set the output format.
Setting the Output File
Now that you've chosen an output format, type the name of the output file into the Output Path field or click on the Browse... button (5) to select the output file using the file chooser.
Generating the Document
Once you have chosen the output file you can generate it by clicking on the Generate button (6) at the bottom of the HTMLDOC window.
Saving Your Book
HTMLDOC can save the list of HTML files, the title
file, and all other options to a special .BOOK file
so you can regenerate your book when you make changes to your
HTML files.
Click on the Save button (7) to save the current book to a file.